You must be signed in to read the rest of this article.
Registration on CDEWorld is free. You may also login to CDEWorld with your DentalAegis.com account.
The proximal surfaces of molars are a common location for carious lesions. Proximal contacts are not as open to the flow of saliva and its natural remineralization benefits. These tight spaces also are more challenging for patients to effectively remove the biofilm. Highly motivated patients, once alerted to the presence of incipient caries lesions, can take action to arrest and reverse the lesions with diet and oral hygiene improvements. Other noninvasive approaches include topical agents such as fluoride varnish and 5,000-ppm fluoride toothpaste.1 Restorative interventions present a challenge in that a significant amount of sound tooth structure must be removed to access proximal lesions, and restorative materials have a finite longevity.2 A minimally invasive treatment option to bridge the gap from prevention to surgical intervention is desirable, and resin infiltration meets this criteria.3
Resin Infiltration Background and Evidence
Resin infiltration allows the practitioner to treat and arrest E1, E2, or noncavitated D1 carious lesions, through enamel, and up to the outer one-third of dentin. The resin infiltrant "fills" in the micro-porosities of the lesion body in enamel and dentin, where minerals have been lost as a result of acid attack from cariogenic biofilm. The resin absorbs into the tooth by capillary action, impregnating the voids left by decalcification, and establishes a diffusion barrier which prevents further mineral loss.4 The resin infiltrant possesses the same refractive index as the surrounding natural enamel, creating the optical illusion of a healthy surface with uniform color.5 Resin infiltration has been described as being like a filling without the drilling, since it actually absorbs into the body of the lesion, arresting it, making it much more than a surface sealant.
The concept of resin infiltration was first described in 1975,6 and the first commercially available product was introduced in 2009. A study by Phark et al from that period showed how the resin infiltration technique complemented existing treatment options for interproximal caries by delaying the time point for a restoration and consequently closing the gap between the two extremes of noninvasive and invasive treatment options.2 A 2015 Cochrane review found that resin infiltration was capable of arresting noncavitated enamel and initial dentinal lesions (limited to outer third of dentin, based on radiograph), and was significantly more effective than non-invasive professional treatment (eg, fluoride varnish) or advice (eg, to floss).7 In 2018, the American Dental Association released their first evidence-based clinical practice guideline on nonrestorative treatments for carious lesions, including the recommendation of resin infiltration to arrest/reverse noncavitated caries lesions on approximal surfaces of primary and permanent teeth.1 A 2019 article in The Journal of the American Dental Association supported the use of resin infiltration for proximal lesions, reporting that after 2 years, lesions that had received it had 18% less absolute risk of experiencing progression than those that did not.8
Properties
There are certain key components of the resin infiltration system which make it capable of arresting caries lesions. The first aspect is the etchant, a 15% hydrochloric acid gel, and its ability to efficiently and effectively remove the pseudo-intact outer layer of enamel (smear layer), opening the enamel and dentin tubules for subsequent absorption of the resin infiltrant. In contrast, a conventional 37% phosphoric acid etch is incapable of adequately removing the outer layer of enamel needed to enable absorption of the resin infiltrant via capillary action.9
The next critical component is the chemical and physical properties of the resin infiltrant itself. A study by Paris and Meyer-Lueckel evaluated the characteristics of the resin material's composition and its impact on penetration coefficient.10 They found that resin mixtures with high TEGDMA (triethylene glycol dimethacrylate) concentrations, such as resin infiltrant, with a penetration coefficient of greater than 200 cm/sec, showed better inhibition of lesion progression than materials with a high concentration of BISGMA (bisphenol A glycidyl methacrylate), such as conventional adhesives, which only have a penetration coefficient of 31 cm/sec. In other words, resin infiltrants are capable of quickly and efficiently absorbing deeper into the lesion body.
Case Selection Criteria
Indication criteria for treatment of proximal lesions by resin infiltration, per the manufacturer, include radiographic extension up to the outer third of dentin, no detectable cavitation, a dry working field is achievable, and lesion progression is likely. The radiographic criteria include radiolucencies confined to the outer half of enamel (E1), radiolucencies in the inner half of enamel including lesions extending up to but not beyond the enamel-dentin junction (E2), and radiolucencies in the dentin, beyond the dentin-enamel junction but within the outer third of dentin and noncavitated.11
Treatment planning and Informed Consent
Obtain informed consent from the patient or parent by reviewing the risks, benefits, and alternatives to treatment with resin infiltration. For example, alternatives would include no treatment, continued monitoring, diet and hygiene improvements, topical fluoride therapies, or surgical management with a conventional class II filling. Benefits of resin infiltration include no shot, no drill, conservation of tooth structure, and caries arrest. Even when not covered by insurance, many patients are willing to pay out-of-pocket. An example is parents who may have had or need dental work redone, such as mesial/occlusal/distal surface fillings cracking and resulting in a need for crowns and root canals. Resin infiltration is attractive to these parents for treating their children's teeth because it is often superior to their own dental experiences; it is also less invasive and will conserve and prolong natural dentition. The CDT code for this procedure is D2990, resin infiltration of incipient smooth surface lesions, and a typical fee for proximal resin infiltration treatment is equivalent to a resin filling.
The Procedure
Proximal resin infiltration can be completed in one short, simple appointment. Local anesthesia is not necessary, though you could consider topical anesthetic, if needed, for placement of a rubber dam clamp. Consider nitrous oxide for young or apprehensive patients, though this is optional. If treating only one proximal lesion, the procedure could be completed in less than 15 minutes; however, beginners should allow 30 minutes for the appointment. Depending on your state dental practice act, the treatment, or portions thereof, can sometimes be delegated to a dental assistant or hygienist. You can check what is permissible in your state by visiting the website of your board of dental examiners, or utilize the resources available on the websites of the American Dental Hygienists' Association (adha.org) or the Dental Assisting National Board (danb.org).
Isolation
A clean, dry field is critical to the success of resin infiltration treatment. The procedure must be completed without contamination from water, saliva, or blood, so a rubber dam isolation is indicated for the proximal application in the posterior dentition. If the patient has a latex allergy, ensure that the non-latex rubber dam is compatible with the materials used in the procedure and on the manufacturer's list of approved items. In particular, rubber dams containing thermoplastic elastomers should be avoided because the material will disintegrate during the procedure.
Clinical Protocol with Case Study
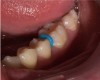
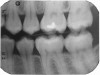
A 28-year-old woman, who previously had braces, had circumferential gumline decalcification (Figure 1) and wished to arrest lesions before they worsened (bitewing, Figure 2). The following protocol is consistent with the product instructions for the resin infiltration material from DMG America, which is the only commercially available resin infiltration system in the US.
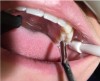
1. Clean area to be treated with plain pumice (Figure 3).
2. Place a separator to create room between the teeth (Figure 1). This can be done up to 1 week in advance of treatment.
3. Place a rubber dam. Local anesthetic is not necessary, but topical anesthetic may be helpful for patients who find the clamp to be uncomfortable.
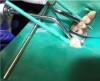
4. Remove the separator. If needed to accommodate the applicator, utilize one of the wedges provided in the proximal resin infiltration kit to create more space between the teeth (Figure 4).
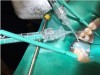
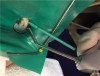
5. Insert applicator with resin infiltration material with green side and perforations facing the surface to be treated (Figure 5).
6. Twist the syringe to dispense the 15% hydrochloric acid gel into the proximal contact space. Etch for 2 minutes.
7. Remove the etch applicator and rinse for 30 seconds.
8. Dry with oil-free air (Figure 6).
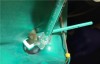
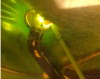
9. Apply resin infiltration material, ethanol, for 30 seconds to see a preview of the final result (Figure 7).
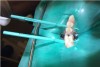
10. Switch off the overhead operatory light, including loupe headlights, so as not to prematurely set the resin.
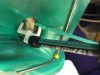
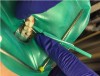
11. Insert the applicator with resin infiltration material syringe attached, and the green, perforated side facing the lesion (Figure 8).
12. Twist the syringe and flood the lesion with the infiltrant for 3 minutes. Occasionally twist the syringe slightly to introduce more infiltrant into the contact, ensuring adequate resin is available as it absorbs into the lesion body.
13. After 3 minutes, remove the applicator.
14. Disperse the excess infiltrant from the proximal contact area with oil-free compressed air (Figure 9).
15. Carefully floss the contact (Figure 10).
16. Light-cure for 40 seconds (Figure 11).
17. Place a new applicator tip and repeat the infiltrant step, this time allowing the resin to absorb for 1 minute, then disperse with compressed air, floss the contact, and light-cure for 40 seconds. This second application of infiltrant is to accommodate for polymerization shrinkage of the resin.
18. Remove the wedge.
19. Rinse thoroughly with water spray, otherwise the patient may notice a sour taste.
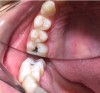
20. Remove the rubber dam, and the procedure is complete (Figure 12).
Case Examples
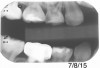
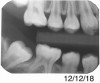
Figure 13 shows a bitewing of a 7-year-old girl with Williams syndrome who had previously required treatment under general anesthesia (GA) in a hospital setting for treatment of caries in her primary teeth. An incipient lesion on the mesial of her lower right permanent first molar, tooth No. 30, was treated more conservatively, in office, with resin infiltration, which allowed her to avoid more invasive treatment and the possible need for another GA. The lesion was arrested (Figure 14) and has been stable for over 5 years.
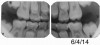
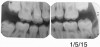
Figure 15 shows bitewings of an 11-year-old boy with high caries risk and history of proximal "kissing lesions" on his primary molars in all four quadrants. He then presented with incipient lesions in his permanent teeth. After resin infiltration (Figure 16), results have been stable for 2 years.
Charting and Documentation
For office software and billing purposes, the CDT code for resin infiltration is D2990; the procedure is coded by tooth number and the surface treated. Patient passbooks, which are provided by the manufacturer, are a helpful tracking option that include a sticker for the patient chart and a record card for the patient to keep in case he or she moves or transfers to a new provider. The infiltrant material is radiolucent, so even after treatment, a dark triangle on a bitewing will remain and can be monitored for stability of the lesion size over time. It is important for a new provider to be made aware that the lesion was previously treated with resin infiltration so as not to misdiagnose it as an active lesion.
Practice Building
Resin infiltration can be a practice builder: patients and parents of pediatric patients may tell friends about it and may even want the procedure themselves. Resin infiltration is worth mentioning and displaying in photographs in a practice newsletter, in the reception area, in marketing materials, and on a dental practice's website, blog, and social media. It also is beneficial to let orthodontists and pediatricians in your area know that you offer this treatment option, which may become a source of new patient referrals for this service.
Conclusion
Resin infiltration is an evidence-based, noninvasive treatment option for arresting proximal carious lesions. With proper case selection and good clinical technique, the procedure is quick and painless, is well tolerated by patients, conserves tooth structure, prolongs the lifespan of the patient's natural dentition, and helps to delay or potentially avoid more invasive surgical treatments altogether. Since an increasing number of patients prefer and seek out minimally invasive treatment options, resin infiltration serves as a practice builder.
References
1. Slayton RL, Urquhart O, Araujo MWB, et al. Evidence-based clinical practice guideline on nonrestorative treatments for carious lesions: a report from the American Dental Association. J Am Dent Assoc. 2018;
149(10):837-849.
2. Phark JH, Duarte S Jr, Meyer-Lueckel H, Paris S. Caries infiltration with resins: a novel treatment for interproximal caries. Compend Contin Educ Dent. 2009;30 (spec no 3):13-17.
3.Okuda WH. Minimally invasive dentistry and its impact on esthetic restorative dentistry. Gen Dent. 2013;61(5):24-26.
4. Meyer-Lueckel H, Paris S. Infiltration of natural caries lesions with experimental resins differing in penetration coefficients and ethanol addition. Caries Res. 2010;44(4):408-414. doi: 10.1159/000318223. Epub 2010 Aug 17.
5. Muñoz MA, Arana-Gordillo LA, Gomes GM, et al. Alternative esthetic management of fluorosis and hypoplasia stains: blending effect obtained with resin infiltration techniques. J Esthet Restor Dent. 2013;25(1):32-39.
6. Davila JM, Buonocore MG, Greeley CB, Provenza DV. Adhesive penetration in human artificial and natural white spots. J Dent Res. 1975;54(5):999-1008.
7. Dorri M, Dunne SM, Walsh T, Schwendicke F. Micro-invasive interventions for managing proximal dental decay in primary and permanent teeth. Cochrane Database Syst Rev. 2015;11:CD010431.
8. Brignardello-Petersen R. Resin infiltration as an adjunct to fluoride varnish seems to reduce the risk of noncavitated proximal carious lesions' progressing after 2 years in patients at high risk of developing caries. J Am Dent Assoc.2019;150(4):e41.
9. Meyer-Lueckel H, Paris S, Kielbassa AM. Surface layer erosion of natural caries lesions with phosphoric and hydrochloric acid gels in preparation for resin infiltration. Caries Res. 2007;41(3):223-230.
10. Meyer-Lueckel H, Paris S. Improved resin infiltration of natural caries lesions. J Dent Res.2008;87(12):1112-1116.
11. Mejàre I, Källest C, Stenlund H. Incidence and progression of approximal caries from 11 to 22 years of age in Sweden: a prospective radiographic study. Caries Res. 1999;33(2):93-100.