You must be signed in to read the rest of this article.
Registration on CDEWorld is free. You may also login to CDEWorld with your DentalAegis.com account.
The goals for a temporary restoration in routine crown and bridge treatments are to protect the tooth, provide an occlusal stop, maintain interproximal contact, and ensure gingival health through proper fit and contour,1,2 all usually for only a few weeks before being discarded. A variety of techniques and materials are used successfully in practices everyday to achieve these goals.
The role of temporization in complex interdisciplinary care is very different. All temporaries must fit the criteria listed above, but in complex cases they become a critical element in the treatment process and may be in place several months or, in some cases, years.3-6 In addition, the technique of construction, as well as the materials chosen, may be quite different in order to meet longevity and esthetic requirements. The most common examples of cases in which long-term temporization is necessary are patients requiring temporaries prior to orthodontics and/
or periodontal surgery, following tooth removal, or while transitioning to an implant-supported prosthesis.
As a general rule, it is always safer and easier to temporize once periodontal surgery has healed or orthodontics have been completed, but in specific instances temporization must be completed first. An obvious example is the presence of old crowns with recurrent caries that cannot be accessed without the removal of the existing crown. In these instances, it is appropriate to remove the crown, clean the tooth, and place a long-term temporary. The patient can then complete whatever periodontal surgery or orthodontics are necessary prior to completing the final restoration, ensuring a better final result than if the final restoration was completed prior to surgery or orthodontics.
If, however, the tooth is simply broken down but doesn’t have an existing crown present, it is generally better to perform a build-up using amalgam or composite, have the orthodontics or periodontics completed, and then complete the definitive restoration.
The most common reasons to place temporaries prior to orthodontics or surgery when teeth do not have existing crowns that are failing involve problems in tooth form.7-9 These may be localized developmental problems (eg, peg-shaped lateral incisors), functional in nature (eg, severe wear), or the result of developmental problems that affect all the teeth (eg, amelogenesis imperfecta). If orthodontics or periodontal surgery is contemplated and the tooth form is not correct, improving the shape of the teeth prior to surgery or orthodontics may be beneficial.
Considerations When Treating Children
In the orthodontic treatment of children, the most common tooth malformations will be developmental in nature.10,11 The general dentist will typically recognize that orthodontics are necessary to treat the patient and refer the patient. The orthodontist then places the brackets on the patient and proceeds with the orthodontic positioning of the malformed teeth to what he or she believes will be the best locations. The restorative dentist then inherits the patient and may be left with a less-than-ideal final result. As a general rule, anytime malformed teeth exist, whether peg-shaped lateral incisors or an entire arch of teeth, it is desirable to correct tooth form to an ideal shape prior to the completion of orthodontics using bonding or, when necessary, temporary crowns. The ideal sequence for treating these patients follows:
1. Obtain a set of mounted models.
2. Cut the teeth free in the model in order to complete an orthodontic set-up on those teeth that will obviously need to be moved.
3. If some of the teeth to be moved exhibit poor form, perform a diagnostic wax-up to correct them.
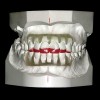
4. Place the corrected teeth and the normal teeth back in the orthodontic set-up (Figure 1).
Both the orthodontist and restorative dentist now have a guide for where treatment is headed. The question then becomes, “When will the tooth shape be corrected: before orthodontics or during orthodontics?” The answer relates to whether there is space currently existing to correct the tooth form. If there is, then it is almost always easier to correct the tooth form prior to bracket placement. If there is insufficient space to correct the shape, then brackets should be placed and space created using orthodontic movement. Once adequate space is created, the brackets can be removed from the teeth that require a shape change, the patient referred back to the restorative dentist, and the teeth temporarily corrected.
The orthodontic set-up and wax-up are used to determine the correct shape for each tooth. Once the tooth shape has been corrected, the patient returns to the orthodontist for replacement of the brackets and archwires. As the orthodontist completes the treatment, they can now move the teeth into the correct positions because the form has been corrected. Not having to attempt to hold a malformed tooth in place, but rather being able to close the arch with interproximal contact on all teeth and level the arch with the correct tooth length, makes the treatment much more predictable.
This same concept can be applied to young patients with congenitally missing teeth7 (eg, a patient with one congenitally missing lateral incisor and the other lateral peg shaped). Often the orthodontist will attempt to open space for the restoration of the peg- shaped lateral and replacement of the missing lateral during treatment. It is very difficult, however, to create and maintain those spaces equally. It is much easier to complete an orthodontic set-up in advance by waxing the pegged lateral to the correct shape, grinding a denture tooth to the correct size, and placing it in the set-up for the missing lateral. The orthodontist then over-opens both lateral spaces, removes the bracket from the pegged lateral, and sends the patient to the restorative dentist for that tooth to be corrected. The patient then returns to the orthodontist, who replaces the bracket on the now correctly shaped lateral, as well as on the denture tooth that was used in the set-up, which is now used as a pontic on the archwires. The spaces are now closed orthodontically and an ideal tooth position results.
Considerations When Treating Adults
In orthodontic treatment of adult patients, a common problem regarding tooth form is wear.9 As in the case of malformed teeth, it is always easier to correct the tooth form prior to the completion of orthodontics. Often, if this is not accomplished, the orthodontist will level the arches, aligning the incisal edges of the worn teeth and leaving the patient with the options of having periodontal crown lengthening or living with short teeth. A far more appropriate treatment is to correct the length of the worn teeth temporarily before or during the orthodontic treatment. This results in level arches with correctly positioned and sized teeth.
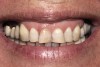
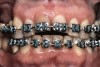
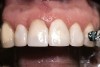
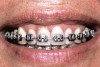
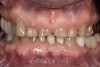
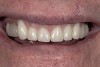
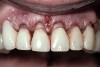
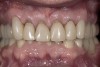
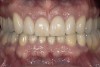
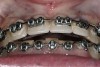
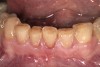
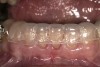
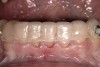
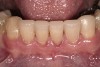
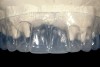
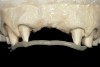
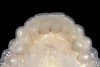
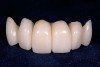
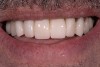
Again, the starting point is a set of mounted models, an orthodontic set-up, and a diagnostic wax-up. The worn teeth are cut from the set-up and waxed to normal length. They are then replaced in the set-up and become the guide for treatment. Whether they are lengthened before or during orthodontics depends upon whether space exists to lengthen them prior to orthodontics. If it does, they can be temporarily restored prior to treatment. If not, the orthodontist must first create space, then de-bracket the worn teeth and send the patient to the restorative dentist for temporary restoration. The brackets are then replaced and the orthodontics completed. The need to open space prior to correcting tooth length is common when utilizing orthodontics to intrude severely worn and over-erupted maxillary or mandibular incisors (Figure 2, Figure 3, Figure 4 and Figure 5).
The most common reasons to place temporaries prior to periodontal surgery relate to the needs for correctly identifying incisal edge position prior to surgery, or gaining access to an edentulous site for ridge augmentation or implant placement when an existing bridge is present. Whenever anterior crown lengthening for esthetic reasons is planned, it is critical that the incisal edge position be identified prior to surgery.12 This is important because, ultimately, the goal of surgery is to position the tissue to create a pleasing tooth size relative to the correct incisal edge.13,14
There are several methods for identifying the correct incisal edge position pre-surgically, including the use of an overlay matrix, altering the contour of the existing teeth using reshaping or bonding, and preparing the teeth and placing temporaries.15 The patient who almost always requires tooth preparation and temporaries in order to correctly identify the incisal edge position is the one with severe wear and a need for the addition of significant length to the incisal edge of the existing teeth. Because there are such significant functional concerns in altering the incisal edge position of these patients, using a simple removable overlay to identify the esthetic position of the incisal edge and gingiva is risky. Instead, it is much more predictable to lengthen the teeth temporarily to evaluate the esthetic and functional success of the new incisal edge position prior to any crown lengthening. If the teeth are amenable to direct bonding to alter incisal edge position, this is often the best approach to temporization. If, on the other hand, the teeth are severely worn and bonding is not realistic, it will probably be necessary to prepare them and place temporaries to evaluate the change. Once it becomes clear that the new incisal edge position is acceptable both esthetically and functionally, the periodontal surgery can be completed to correct gingival levels and, therefore, crown length (Figure 6, Figure 7, Figure 8, Figure 9 and Figure 10).
The other time temporization is necessary prior to surgery is when an existing fixed prosthesis is present and the patient requires ridge augmentation or desires an implant. In these instances, the existing fixed restoration must be removed and a temporary placed. The only difference between this temporary and any other that might be made is the length of time required for it to function and, if it is a multiple pontic span, the need for reinforcement.
Temporary Techniques and Materials
Once the decision is made to temporize a patient as part of orthodontic treatment or prior to periodontal surgery, it becomes necessary to decide how to proceed. Several options exist, and the decision of which to use depends upon how long the temporaries must function and what the final restoration will be (eg, bonded veneers or full crowns).
As a rule, if the tooth can ultimately be restored with direct composite or a porcelain veneer, I prefer to temporize using direct bonding. I say temporize with direct composite because, in this instance, the patient will undergo either orthodontics or periodontal surgery and, after either one, it is highly likely that the restorations will require modifications or remakes to look more ideal. Therefore, I use a technique that can produce the desired tooth form and create an acceptable esthetic result, but which takes very little time.
The key is to use a very accurate diagnostic wax-up of the desired tooth shape.16,17 An alginate impression is then made of the wax-up, and the impression poured in stone. This stone replica of the diagnostic wax-up is used to make a clear, pressure formed 1.5-mm matrix. The matrix is tried in the mouth, and any areas on the teeth that should be modified in order to ensure that the matrix fits are adjusted. All the teeth are then etched, adhesive is applied, and the matrix is loaded with composite and seated. The composite is then cured through the matrix, the matrix peeled off and, using finishing burs, the embrasures refined. A saw can be used to separate the teeth, which were basically created as one block of composite. This technique has allowed me to bond multiple teeth to a predictable form very quickly. If your composite is stiff, warming it in hot water can facilitate a better flow when seating the matrix.
When bonding is to be performed prior to surgery or orthodontics, this technique is easy because the tooth position won’t change, so a current model can be used to perform the diagnostic wax-up. If some orthodontics will be necessary to create space prior to bonding, a new problem arises. The wax-up cannot be completed until the tooth position has been altered.
In such cases, I request that the orthodontist start treatment and correct the tooth position as best as possible prior to my temporization. Once the teeth have moved and space exists for temporization, the orthodontist removes the archwires, and I make an alginate impression of the patient’s new tooth position; the brackets are still on the teeth, but not the archwires. I then take the model, grind the brackets off the teeth to be bonded, perform the wax-up, and create the clear matrix. Again, this matrix is used to rapidly direct-bond multiple teeth to the correct shape simultaneously (Figure 11, Figure 12, Figure 13, Figure 14, Figure 15 and Figure 16).
There are multiple advantages to using a direct composite material for temporaries. It is durable, and because the teeth aren’t prepared, the risk of sensitivity, leakage, or caries that may occur when using long-term temporaries is greatly reduced.
If it will be necessary to prepare the teeth and place full-crown temporaries as part of the long-term treatment, several variables must be addressed. These include material selection, whether or not to reinforce the temporary, and what type of cement should be used.
The standard day-to-day temporary materials are typically not good choices for more than a few months of provisionalization. I use three categories of temporary materials for long-term use. For a full arch of full-crown restorations, or occasionally long-span fixed partial dentures, I will use a laboratory processed composite resin shell (eg, multiple different laboratory resins available from different companies) that will then be relined in the mouth using a self-curing composite temporary material. For partial-coverage or full-coverage temporaries—but not a full arch—that require at least 6 months or more of function, or when maintenance of esthetics is critical over the life of the temporary, I use a light-cured temporary material. I also choose this material whenever the patient will wear the temporary during orthodontics. Finally, for anything that must last less than 6 months—other than a full arch of full crowns—a chemically-cured composite temporary material is used.
I typically reinforce only when pontics are present, and generally only when there are two or more pontics and the temporary must last more than 1 to 2 months.18 I use fiber for reinforcement, and I prefer to make the reinforced temporary indirectly on a model, starting with a wax-up and clear matrix prior to preparing the teeth.
To reinforce temporary restorations, begin by preparing the teeth and making an impression of the preparations. Pour the impression with one-third die stone and two-thirds mounting stone, so it sets quickly. Then ensure that the matrix fits the model. The fiber can now be placed across the preparations on the model and tacked into place with flowable composite. Once the fiber is positioned, try the matrix back on to verify clearance between the fiber and the matrix. If the clearance is acceptable, remove the matrix and reinforce the fiber by adding more flowable composite across its length. Finally, lubricate all areas of the model with petroleum jelly or foil substitute, keeping all lubricant off the fiber. Then, load the matrix with the desired temporary material and seat it over the preparations and the fiber. After curing, it can be trimmed and seated in the patient’s mouth (Figure 17, Figure 18, Figure 19, Figure 20 and Figure 21).
Finally, it is necessary to determine what to use for long-term provisional cementation. I use two cements: either reinforced zinc oxide-eugenol cement or resin-reinforced glass ionomer luting cement. The choice depends upon whether or not the patient is undergoing orthodontics. If the patient is undergoing 1 to 2 years of orthodontics, I use the resin-reinforced glass ionomer cement, which eliminates—to a great extent—the risk of caries, leakage, sensitivity, or loosening. However, the temporary will have to be cut off and a new one made following the completion of orthodontics. For all other long-term temporaries, I use the reinforced zinc oxide-eugenol cement, which seals well, rarely loosens, virtually eliminates sensitivity, but which can be removed. If the final restoration will be adhesively bonded, you can pumice or, better yet, air abrade the tooth to clean the preparation. When using the reinforced zinc oxide-eugenol cement, however, it is necessary to check the patient every 8 to 12 weeks to ensure that nothing has loosened.
The final issue concerning long-term temporization involves modifying temporaries that have been in the mouth19 (eg, after crown lengthening, when it is necessary to re-prepare the tooth, dropping the margin more apically). Rather than making an entirely new set of temporaries, I prefer to reline the existing ones. The key is adding to them so that the addition bonds and blends with the old material. The following steps have been effective for relining and re-using older temporaries.
1. Remove the temporary and sandblast out any old cement.
2. Use an acrylic bur to remove a few tenths of a millimeter of material from the inside; bevel the outside of the temporary several millimeters up from the cervical margin.
3. Re-sandblast the entire temporary.
4. Cover the temporary for 10 minutes with Naval Jelly (ie, 32% phosphoric acid), available from a hardware store.
5. Ultrasonic for 5 minutes in water.
6. Brush on an adhesive and reline with a composite-based temporary material or flowable composite.
7. Cure and trim.
Conclusion
I have not described all of the reasons for placing long-term temporaries, nor all of the ways their use may be sequenced in conjunction with orthodontics or periodontal surgery. Rather, I have described the most common reasons I have encountered in 25 years of practicing esthetics and fixed prosthodontics for their placement. While there are several techniques and materials that can be used for long-term provisionalization, those described herein have been effective in eliminating the frustration and maintenance that can occur when incorporating long-term temporaries into interdisciplinary treatment.
References
1. Amsterdam M, Fox L. Provisional splinting: principals and techniques. Dent Clin North Am. 1959;4:73-99.
2. Yuodelis RA, Faucher R. Provisional restorations: an integrated approach to periodontics and restorative dentistry. Dent Clin North Am. 1980;24:285-303.
3. Chiche GJ. Provisional restorations in anterior procedures. Dent Today. 1994;13:32,34-37.
4. Amet EM, Phinney TL. Fixed provisional restorations for extended prosthodontic treatment. J Oral Implantol. 1995;21:201-206.
5. Christensen GJ. Provisional restorations for fixed prosthodontics. J Am Dent Assoc. 1996;127:249-252.
6. Donovan TE, Cho GC. Diagnostic provisional restorations in restorative dentistry: the blueprint for success. J Can Dent Assoc. 1999;
65:272-275.
7. Kokich VG. Managing orthodontic-restorative treatment for the adolescent patient. In: McNamara JA Jr., ed. Orthodontics and dentofacial orthopedics. Ann Arbor, MI: Needham Press, Inc.
8. Vanarsdall RL. Orthodontics. Provisional restorations and appliances. Dent Clin North Am. 1989;33:479-496.
9. Kokich VG, Spear FM. Guidelines for managing the orthodontic-restorative patient. Semin OrthodM. 1997;3:3-20.
10. Kotsomitis N, Freer TJ. Inherited dental anomalies and abnormalities. ASDC J Dent Child. 1997;64:405-408.
11. Tahmassebi JF, Day PF, Toumba KJ, et al. Pediatric dentistry in the new millennium: 6. Dental anomalies in children. Dent Update. 2003;30:534-540.
12. Spear FM. Facially generated treatment planning. Presented at: American Academy of Esthetic Dentistry, 16th Annual Meeting; August 8, 1991; Santa Monica, CA.
13. Rufenache CR. Fundementals of Esthetics. Chicago: Quintessence Publishing; 1990.
14. Chiche GJ. Pinault A. Esthetics of Anterior Fixed Prosthodontics. Chicago: Quintessence Publishing; 1994.
15. Spear FM. Construction and use of a surgical guide for anterior periodontal surgery. Contemp Esthet Restor Pract. 1999;April:12-24.
16. Magne P, Magne M, Belser U. The diagnostic template: a key element to the comprehensive esthetic treatment concept. Int J Periodontics Restorative Dent. 1996;16:560-569.
17. Magne P, Douglas WH. Additive contour of porcelain veneers: A key element in enamel preservation, adhesion and esthetics for aging dentition. J Adhes Dent. 1999;1:81-92.
18. Hazelton LR, Nichols JI, Brudvik JS, et al. Influence of reinforcement design on the loss of marginal seal of provisional fixed partial dentures.Int J Prosthodont. 1995;8:
572-579.
19. Gegauff AG, Rosenstiel SF. Effect of provisional luting agents on provisional resin additions. Quintessence Int. 1987;18:841-845.
About the Author
Frank M. Spear, DDS, MSD
Founder and Director
Seattle Institute for Advanced Dental Education
Seattle, Washington
Affiliate Assistant Professor
University of Washington School of Dentistry
Seattle, Washington
Private Practice
Seattle, Washington
This article was reprinted with permission from Advanced Esthetics and Interdisciplinary Dentistry,
Vol. 1, No. 3, 2005