You must be signed in to read the rest of this article.
Registration on CDEWorld is free. You may also login to CDEWorld with your DentalAegis.com account.
The Glossary of Prosthodontics Terms definition for denture esthetics is “the effect produced by a dental prosthesis that affects the beauty and attractiveness of the person.”1 It is, essentially, subjective rather than objective; it is not an exact science. However, certain guidelines can help to establish a pleasing esthetic and functional outcome (Table 1).2 These guidelines can be considered as a set of parameters within which there is room for individual variation during denture construction.
Tooth Placement
There are fundamental guidelines that must be followed when setting teeth. The teeth must be placed in the “neutral zone.” The neutral zone is defined as “the potential space between the lips and cheeks on one side and the tongue on the other: that area or position where the forces between the tongue and cheeks or lips are equal.”1 In the anterior region, this zone is close to the residual ridge, as were the original teeth. The location of the occlusal plane, the determined vertical dimension of occlusion, and horizontal maxillomandibular jaw relationships are all factors that will impact the final tooth position and, ultimately, the overall esthetics.3 These processes and techniques are beyond the scope of this article.
Anterior Tooth Selection
Tooth selection is completely subjective. However, there are some methods that will be discussed to help in the process. Initial tooth selection is only a tentative step that can be verified by the dentist using the trial denture base, and confirmation by the patient.
Shade
Select two or three shades that are harmonious with the patient’s general facial coloration and complexion. Avoid shades that are excessively light. Place the shade tab up to the sclera of the eyes (white region). If the tab is significantly brighter than the eyes, the value is too high. The clinician should ask the patient which of the two to three shades they like. In this manner, the clinician guides the patient in order to avoid a grossly light, dark, or plain tooth, but still engages the patient in the decision-making process.2,/p>
Size and Shape
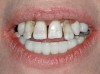
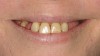
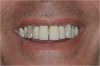
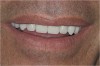
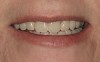
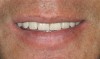
Patient pre-extraction records (Figure 1 through Figure 6) can be a considerable help in establishing some parameters for tooth mold selection. These include diagnostic casts of the patient’s natural or restored teeth before extraction of the remaining teeth; recent photographs of the patient before loss of teeth; and radiographs (to a lesser degree).2-4
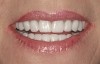
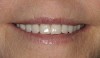
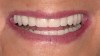
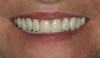
For patients who present completely edentulous at the time of initial examination, evaluation of their existing dentures can be of assistance. Are the current denture teeth satisfactory in shape and size? Should they be shorter, wider, longer, and/or a different shade (Figure 7 and Figure 8)? If the dentures are unsatisfactory, various theories or ideas about how to select denture teeth can be employed.2,3
The theory of matching teeth to face form (typal form theory), as first proposed by Williams in 1914, can be helpful: square, tapering, or ovoid characteristics.5 While the theory is scientifically unsound, many tooth manufacturers still use this as a subjective basis for tooth selection.6 However, when used with other techniques discussed in this article, it can be a helpful, yet subjective tool (Figure 9 through Figure 14).2
The concept of dentogenics, introduced in the 1950s, takes the patient’s gender, personality, and age into consideration. For example, teeth with rounded corners and a delicate appearance project femininity. However, prominent wider centrals, square edges, incisal abrasion, and worn cuspid tips indicate the wear of aging combined with the projection of a personality of strength and vigor (Figure 9 through Figure 14).7-9 Although dentogenics is another useful tool for overall tooth selection/arrangement, in the author’s opinion, the challenge may be with the patient accepting the natural, aged esthetics this approach prescribes.
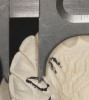
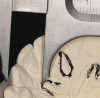
Selecting tooth size is challenging. Although using the patient’s facial anatomical dimensions, such as the bizygomatic width, interpapillary distance, width of the nose (interalar distance), width of the filtrum of the lip, and intercommisural distance have been proposed to aid in size selection,2,10 there is a lack of consensus within the literature.11-16 Consequently, facial dimensions, and formulas can only be used as a guide or reference. Trial and error, operator experience, and patient involvement will prove more beneficial in choosing suitable tooth dimensions. Some of the purported formulas include the following: divide the bizygomatic width by 16 to arrive at an estimate of the width of the maxillary central incisor; or divide by 3.3 to arrive at the approximate width of the six anterior teeth arranged on a curve of a properly contoured wax-occlusion rim;2,10 or increase the interalar distance by 31% as an estimate of the circumferential distance of the six maxillary anterior teeth.14
Clinically, the wax-occlusion rim can be of assistance: mark the corners of the mouth or commissures with the lips at rest and at the high lip-line when smiling/laughing on the wax occlusal rim. Measure the length of the wax rim on the curve between the lateral markings (with a plastic flexible ruler). This measurement will approximate the width of the six maxillary anteriors. As a general guide, upper anterior teeth that have an overall width as listed on tooth-selection charts as less than 48 mm are considered relatively small teeth.2,3 Those listed as over 52 mm are relatively large teeth.2,3 Measure the height. This measurement will give a minimum approximation on the length of the tooth to minimize artificial soft-tissue display when smiling.2,3
Anterior Tooth Arrangement
The most challenging esthetic reconstruction is one where there are no remaining frames of reference. In essence, the edentulous patient optimizes this dilemma. Consequently, where do the dentist and technician begin? From evaluating the oral anatomy of dentate individuals, certain averages can be used to help with the placement of teeth in the completely edentulous patient.
Soft Tissue Guidelinesfor Placing Teeth
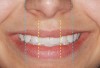
In young persons, a line connecting the tips of the canines often traverses the incisive papilla. In elderly patients, the line passes posterior to the papilla.17-20 The distance from the middle of the incisive papilla to the labial surface of the maxillary central incisor (Figure 15) is normally 8 mm (with a range of 8 mm to 10 mm). The labial surface of the canine is normally 10.5 mm (± 1 mm) from the lateral aspect of the anterior rugae (Figure 16). The distance between the tips of the canines correspond to the width of the nose (Figure 17).2,17-22
Phonetics
The position of the anterior teeth and palatal contours will have a profound effect on speech. Affected sounds include bilabial (“p,” “b”), labio-dental (“f,” “v”), linguo-dental (“th”), and linguo-palatal (“s”). For example, the maxillary incisal edges should be positioned so that the labio-dental fricative sounds (“f,” “v,” and “ph”) are correctly pronounced: incisal edges should lightly touch the vermillion border (wet-dry line) of the lower lip. Labio-dental sounds are created when the tip of the tongue touches the incisal edges of the maxillary anterior teeth, slightly obstructing airflow between the palate and tongue. Consequently, labio-dental and linguo-dental sounds provide a useful guide when determining the proper plane of occlusion and anterior tooth position.2,3,23,24 Linguo-palatal sibilants (“s,” “z,” “c,” and “ch” sounds) can help to determine correct tooth positioning and occlusal vertical dimension. The sound is made with the tongue against the palate/rugae area and a small space created for the air to escape. If the space between the front teeth is too small, a whistle may result. If it is too large, a lisp is created with the “s” being replaced by a “sh.”3,23,24
Setting Anterior Teeth
With initial determination of the maxillary incisal edge position, the length of the maxillary wax occlusion rim is adjusted to coincide with the patient’s lip line at rest, or 1 mm to 2 mm beyond the lip line, depending on overall esthetic preference for the patient. However, tooth display beyond 4 mm (lip at rest) may be considered unesthetic.25,26 The anterior plane must also be parallel to the interpupillary line to minimize the potential of incorporating an incisal plane canter in the anterior set-up. The occlusal plane is parallel to the Camper’s line (the superior border of tragus of the ear to inferior border of the ala of the nose).2,25,26 This plane of reference is critical in determining the position of the maxillary central incisors. It is, therefore, recommended that this anterior reference plane be recorded permanently onto the art-form (non-anatomical portion of the stone cast) of the maxillary cast:27
1. Take an arbitrary length (eg, 3 cm) and mark a point (with a pencil) on the labial art-form of the maxillary cast (from the wax occlusion rim surface) to correspond to the position of all six maxillary anterior teeth.
2. Line up these 6 markings and draw a straight line on the art-form surface. This line should be parallel to the anterior wax occlusion rim, and 3 cm away from the wax surface.
3. With a sharp blade, score this line permanently onto the cast surface.
The purpose of scoring a line parallel to the anterior wax occlusion rim and 3 cm from the wax surface onto the cast art-form is to record the anterior lip-line position and incisal plane of the patient permanently onto the cast. Consequently, should the anterior teeth require re-setting at any point, the original lip-line recorded at the maxillomandibular record appointment can be retrieved by measuring the distance between the scored line and the incisal edges of the maxillary anterior teeth. This distance, therefore, should always be 3 cm for the maxillary central incisors and canines.27
Maxillary Anterior Teeth
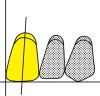
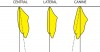
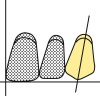
The dental midline is recorded in the maxillary wax rim. The marking should be both coincident with the facial midline and vertically straight. This position often corresponds to the maxillary labial frenum.28 The initial setting of the anterior teeth is consistent with the established wax plane of occlusion. Besides using techniques discussed previously, various laboratory devices, such as an occlusal plane indicator, can also provide assistance with the vertical positioning of the maxillary anterior teeth. Figure 18 through Figure 24 show the long axis of each tooth (broken line) and the orientation that the teeth should take in the wax occlusion rim (solid line). This mnemonic can help in remembering the bucco-lingual inclination of the maxillary anterior teeth (labial surface, from an occlusal view): M-I-G (middle third for the central incisor, incisal third for the lateral incisor, and the gingival third for the canine).2,27,29
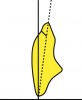
In Figure 18 and Figure 19, the maxillary central incisor is placed so that the long axis shows a slight distal inclination to the perpendicular. The incisal edge is on the occlusal plane (level of the lip line at rest, or 1 mm to 2 mm below and/or beyond the lip line). The neck of the tooth should be slightly depressed. However, the facial surface of the tooth is nearly perpendicular to the occlusal plane. Consequently, when viewing the incisor from an occlusal view (perpendicular to the occlusal plane), the middle third of the facial surface is most prominent.
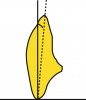
In Figure 20 and Figure 21, the maxillary lateral incisor has slightly more distal inclination than the central incisor. The incisal edge is usually 0.5 mm to 1 mm above the occlusal plane. The neck of the maxillary lateral incisor is depressed more than the central incisor, although the labial surface will be nearly in line with the central incisor. Consequently, when viewing the lateral incisor from an occlusal view (perpendicular to the occlusal plane), the incisal third is most prominent.
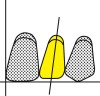
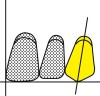
In Figure 22 and Figure 23, the long axis of the maxillary canine also has a slight distal inclination. The incisal tip is on the incisal plane. However, in a balanced occlusal scheme, the vertical position may have to be raised or lowered to achieve “kissing contact” in excursive movements.27,29 The neck of the maxillary canine is prominent. Consequently, when viewing the canine from an occlusal view (perpendicular to the occlusal plane), the gingival third is most prominent.
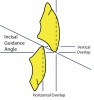
In Figure 24, the incisal guidance angle is formed by a line drawn through the incisal edges of the maxillary and mandibular incisors and the horizontal plane. In denture construction, the mandibular incisors should never touch the maxillary incisors in centric occlusion/relation and the incisal guidance should be kept as low as possible to enhance free movement of the teeth in protrusive and lateral excursions. Protrusive and lateral working movements will produce “kissing contact.”
The angle of the anterior guide table is based on the cusp angulation of the posterior teeth.
With a lingualized occlusal set-up, the incisal guide table is set to the angle of the lower posterior teeth.2,27,29,30
The anterior teeth should be examined from the occlusal aspect to ensure that the facial surfaces of the teeth follow the arch contours. The incisal edges of the anterior teeth should line up.
Mandibular Anterior Teeth
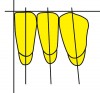
Initially, the mandibular anterior teeth are set on an even plane accommodating an approximate overjet/overbite relationship dependent on the working incisal guidance angle (see Figure 24). However, the vertical position is fine-tuned on the articulator during protrusive and lateral movements so that each individual tooth is in “kissing contact” with the maxillary teeth (Figure 25). This figure shows the mesio-distal inclinations of the mandibular anterior teeth and an example of variations of incisal position after adjustment to maintain “kissing contact” (in excursive movements).2,27,29 The incisal position will vary depending on the position of the maxillary incisor teeth and the incisal guidance angle. Figure 26 shows the bucco-lingual inclinations of the mandibular anterior teeth. The mandibular central incisors are set with the long axis perpendicular to the occlusal plane with the neck depressed. The mandibular lateral incisors are set with a slight distal inclination and with the facial surface at a right angle to the occlusal plane. The mandibular canines have more distal inclination than the lateral incisors and the neck is set prominently. As can be seen, the maxillary anterior teeth positions will determine the vertical positioning of the mandibular anterior teeth.2,27,29,30
Additional Considerations
Once the principles of anterior tooth arrangement as discussed above are understood, variation from the norm without losing natural inclinations will make artificial teeth appear more natural. However, many patients do not request natural findings such as overlaps, significant differences in the level of the incisal edges, rotations, or diastemas.31,32 Unless requested, such variations should be avoided. However, one variation from the norm that is esthetically pleasing involves placing the maxillary canines up to 1 mm above the wax-rim incisal plane. This allows the incisal edges of the maxillary anterior teeth to follow the lower lip when smiling, enhancing the overall esthetic result (Figure 27).2,27,29,33-35
The principles of tooth selection and arrangement discussed here also apply to the restoration of completely edentulous patients with implant-supported overdentures or fixed restorations. Although the functional principles related to tooth arrangement in complete denture therapy do not apply to dentate individuals, an improved understanding of the esthetic guidelines can provide additional insight to the esthetic evaluation of dentate individuals.
Complete Denture Delivery: Patient Instructionsand Maintenance
After delivery-appointment denture adjustments, each complete denture requires a 24-hour, 1 week, and 2-week adjustment before the case is complete. The key to treatment outcome success with all treatment modalities involves setting realistic patient expectations before the commencement of treatment. However, certain difficulties that may be encountered and various factors related to the care of dentures should be explained to the patient before they have worn their new restorations. It is much better to forewarn a patient of probable difficulties than to have them encounter the problems and then erroneously relate them to the “denture fit.” Some of the issues that should be discussed with the patient are briefly stated below.27,36
Getting Used to the Feel of Dentures
New dentures will feel strange and bulky in the mouth. They will cause a feeling of fullness of the lips and cheeks. This is true even if the patient has worn dentures for years. The lower denture is usually much more difficult to become accustomed to than the upper denture. There will be an excessive flow of saliva for the first few days until the glands in the mouth become adjusted to the presence of the new dentures.
A great deal of control of complete dentures results from manipulations of the tongue, cheeks, and lips. If a patient has become accustomed to old dentures over a long period of time, new habits must be formed with the new dentures. It is usually more difficult for a patient who has not worn dentures for some time to become accustomed to them than it is for a patient who is accustomed to wearing dentures.
Although great care has been used to construct dentures that are compatible with the surrounding tissues, the dentures move on the tissues and soreness will usually develop for varying periods at different locations in the mouth. The patient must return so that the dentist can adjust the dentures or the way that the teeth meet to correct the soreness in the mouth. The patient should never attempt to adjust the dentures themselves.
It is essential that the patient return for a 24-hour adjustment. At this time, the denture-bearing tissues will be examined for irritation, over-extension, and occlusal problems. Importantly, the patient must make up his or her mind to master wearing the dentures. This can only be done by keeping the dentures in the mouth more than they are out. Remind the patient that the tissues surrounding the dentures will function more naturally after the dentures have been worn for several weeks.
Some patients’ tongues (approximately 35%) normally rest in a retracted position in relation to the lower anterior teeth. Such patients should attempt to learn to position the tongue farther forward so that it rests on the lingual surfaces of the lower anterior teeth. This position helps to develop stability for the lower dentures.
Speech
Speaking normally with dentures requires practice but usually is not a great problem. The patient should read aloud and repeat any words or phrases that are difficult to pronounce. The patient should be counseled that he or she will be much more aware of small problems in speech sounds than anyone else.
Mastication
Learning to chew well with dentures normally requires at least 6 to 8 weeks. The patient should begin chewing relatively soft food cut into small pieces. If chewing can be done on both sides simultaneously, the tendency of the dentures to tip will be reduced.
Educate the patient that anterior teeth are placed in a denture for esthetic purposes, and posterior teeth are placed for functional purposes. Chewing is accomplished with the posterior teeth. Incising of food is accomplished in the premolar area. When incising with dentures, the food should be placed between the teeth posteriorly to break it apart rather than pulling downward and outward as one would with natural teeth. This produces an inward and upward force, which tends to seat the dentures on their residual ridges rather than to displace them.
When a patient has gone without dentures for a long time, at first he or she will be able to masticate better without the dentures than with them. However, the patient must leave the new dentures in while chewing to learn how to use them. Eventually, the patient should masticate better with the denture than in the edentulous condition. The same is true for old dentures. Do not allow the patient to fall back to the old comfortable pair of “shoes.” He or she must learn to use the new restorations.
Using Denture Adhesives
The use of denture powders/adhesives 37,38 are contraindicated for use under ill-fitting dentures. However, with well-adapted and satisfactory complete dentures, denture adhesives have the following indications: severely atrophied residual ridges; xerostomia; tissue-supported removable partial dentures. Denture adhesive cream (eg, Polygrip Ultra® or Super Poligrip®, GlaxoSmithKline Co, www.gsk.com; Fixodent® Denture Adhesive Creams, Proctor and Gamble, www.pg.com; Cushion Grip®, Schering-Plough Healthcare Products, Inc, www.schering-plough.com) is to be applied in small pea-size increments distributed throughout the denture base, as needed, preferably prior to meals. The adhesive may require re-application throughout the day (two to three times). Denture powder (eg, Super Wernet’s®, GlaxoSmithKline Co; Rigident® Adhesive Powder, Church and Dwight Co, www.churchdwight.com; Fixodent® Adhesive Powders, Proctor and Gamble;) is sprinkled over the wet denture intaglio surface, with the excess shaken off before placement in the mouth.
Caring for Dentures
Dentures should be left out of the mouth at night to give the supporting tissues adequate rest. This allows blood flow to return to normal for about 8 hours a day. Wearing a denture decreases the blood flow to the residual ridge. If this blood is kept away from the ridge, resorption will be greater than normal. When dentures are left out at night, they should be placed in water to prevent drying and possible dimensional changes.
Dentures should be thoroughly brushed after every meal. The dentures should be removed from the mouth and brushed with a denture brush using denture toothpaste. Regular toothpaste is too abrasive for dentures. The dentures should be brushed over a basin that is partially filled with water or over a towel to minimize the chances of breaking the dentures should they slip out of the hands.
Denture cleansers can also provide an effective adjunct to a patient’s denture oral hygiene regimen. For example, Polident® effervescent denture tablets (GlaxoSmithKline) or Denture Cleanser® (Johnson and Johnson Health-care Products, www.jnj.com) can be used in the storage water with the dentures in place. Different formulations are available for a 3-minute soak or overnight, and also for cast metal-frame partial dentures. It is important to note that many regular toothpastes have abrasives in their formulations that can dull the acrylic finishes of complete or partial dentures. Either hand soap or special denture toothpastes are recommended (eg, Fresh’n Brite Denture Toothpaste, Caldwell Consumer Health, LLC, www.caldwellpharma.com; Plident Dentu-Creme® or Polident Dentu-Gel®, GlaxoSmithKline). A regular toothbrush or denture brush (eg, Wernet Denture Brush®, GlaxoSmithKline; Oral B Denture Brush, Sunstar GUM Butler Dental Products, www.jbutler.com) can be used. Denture brushes are not to be used intraorally.
Dental Visits
Patients who wear dentures still require routine dental examinations. Tissues under dentures change with time depending on many factors, the general health of the patient being one of the most important. Dentures become ill-fitting and can damage the supporting tissue without the patient being aware that anything is wrong because it happens over a long period of time. Lesions can develop in the oral cavity that may or may not be associated with the dentures. All edentulous patients should be examined by a dentist at least once a year.
Dentures are not intended to be permanent. The denture will become worn over time and will lose its fit because of changes in the residual ridge. A replacement should be considered every 7 to 10 years and a reline should be considered from time to time (according to how quickly ridge resorption occurs; on average every 2 to 3 years).
References
1. The Glossary of Prosthodontic Terms. J Prosthet Dent. 2005;(94)1:10-92.
2. Essentials of Complete Denture Prosthodontics. 2nd Ed. Chapter 12. Winkler S, ed. St. Louis, MO, and Tokyo, Japan; Ishiyaku EuroAmerica, Inc: 1994.
3. Roumanas ED. The social solution: denture, esthetics, phonetics, and function. J Prosthodont. 2009;18:112-115.
4. Bissasu M. Pre-extraction records for complete denture fabrication: a literature review. J Prosthet Dent. 2004;91(1):55-58.
5. Williams JL. A new classification of human tooth forms with special reference to a new system of artificial teeth. Dent Cosmos. 1914;56:627-628.
6. Sellen PN, Jagger DL, Harrison A. Methods used to select artificial anterior teeth for the edentulous patient: a historical overview. Int J Prothodont. 1999;12(1):51-58.
7. Frush JP, Fisher RD. Introduction to dentogenic restorations. J Prosthet Dent. 1955;5:586-595.
8. Frush JP, Fisher RD. The dynesthetic interpretation of the dentogenic concept. J Prosthet Dent. 1958;8:558-581.
9. Jameson WS. Dynesthetic and dentogenic concept revisited. J Esthet Restor Dent. 2002;14(3):139-148.
10. Engelmeier RL. Complete-denture esthetics. Dent Clin North Am. 1996;40(1):71-84.
11. Varjao FM, Nogueira SS. Nasal width as a guide for the selection of maxillary complete denture teeth in four racial groups. J Prosthodont. 2006;15(6):353-358.
12. Varjao FM, Nogueira SS, Filho JN. The center of the incisive papilla for the selection of complete denture maxillary teeth in four racial groups. Quintessence Int. 2008;39(10):841-845.
13. Gomes VL, Goncalves LC, do Prado CJ, et al. Correlations between facial measurements and the mesiodistal width of the maxillary anterior teeth. J Esthet Rest Dent. 2006;18(4):196-205.
14. Gomes VL, Goncalves LC, Cost MM, Lucas Bde L. Interalar distance to estimate the combined width of the six maxillary anterior teeth in oral rehabilitation treatment. J Esthet Restor Dent. 2009;21(1):26-35.
15. Zlataric DK, Kristek E, Celebic A. Analysis of width/length ratio’s of normal clinical crowns of the maxillary anterior dentition: correlation between dental proportions and facial measurements. Int J Prosthodont. 2007;20(3):313-315.
16. Hasanreisoglu U, Berksun S, Arask K, Arsalan I. An analysis of maxillary anterior teeth: facial and dentalproportions. J Prosthet Dent. 2005;94(6):530-538.
17. Ehrlich J, Gazit E. Relationship of the maxillary central incisors and canines to the incisive papilla. J Oral Rehabil. 1975;2:309-312.
18. Ortman HR, Tsao DH. Relationship of the incisive papilla to the maxillary central incisors. J Prosthet Dent. 1979;42:492-496.
19. Mersel A, Ehrlich J. Connection between incisive papilla, central incisor and rugae canina. Quintessence Int. 1981;12:1327-1329.
20. Schiffman P. Relation of the maxillary canines to the incisive papilla. J Prosthet Dent. 1964;14:469-472.
21. Grave AM, Becker PJ. Evaluation of the incisive papilla as a guide to anterior tooth position. J Prosthet Dent. 1987;57:712-714.
22. Grove HF, Christensen LV. Relationship of the maxillary canines to the incisive papilla. J Prosthet Dent. 1989;61:51-53.
23. Pound E. Let “S” be your guide. J Prosthet Dent. 1977;38:482-489.
24. Pound E. Controlling anomalies of vertical dimension and speech. J Prosthet Dent. 1976;36:124-135.
25. Kokich VO Jr, Kiyak HA, Shapiro PA. Comparing the perception of dentists and lay people to altered dental esthetics. J Esthet Dent. 1999:311-324.
26. Tjan AH, Miller GD, The JG. Some esthetic factors in a smile. J Prosthet Dent. 1984;51:24-8.
27. Leopardi A. Complete Denture Clinic Manual. University of Detroit Mercy, School of Dentistry. 1997.
28. Miller EL, Bodden WR Jr, Jamison HC. A study of the relationship of the dental midline to the facial median line. J Prosthet Dent. 1979;41:657-660.
29. Removable Prosthodontic Techniques: Dental Laboratory Technology. Sowter JB, Barton RE, eds. The University of North Carolina Press. 1989.
30. Lang BR. Complete denture occlusion. Dent Clin North Am. 2004;48(3):641-665.
31. Brisman AS. Esthetics: a comparison of dentists’ and patients’ concepts. J Am Dent Assoc. 1980;100:345-352.
32. Marunick MT, Chamberlain BB, Robinson CA. Denture aesthetics: an evaluation of laymen’s preferences. J Oral Rehabil. 1983;
10:399-406.
33. Dong JK, Jin TH, Cho HW, Oh SC. The esthetics of the smile: a review of some recent studies. Int J Prosthodont. 1999;12:9-19.
34. Carlsson GE, Wagner IV, Odman P, et al. An international comparative multicenter study of assessment of dental appearance using computer-aided image manipulation. Int J Prosthdont. 1998;11:246-254.
35. Hulsey CM. An esthetic evaluation of lip-teeth relationships present in the smile. Am J Orthod. 1970;57:132-144.
36. Essentials of Complete Denture Prosthodontics. 2nd Ed. Chapter 19. Winkler S, ed. St. Louis, MO, and Tokyo, Japan; Ishiyaku EuroAmerica, Inc: 1994.
37. Stafford GD. Denture adhesives: a review of their uses and compositions. Dent Pract Dent Res. 1970;21:17-19.
38. Grasso JE. Denture adhesives. Dent Clin North Am. 2004;48:721-733.
Table
| FRONTAL VIEW Anterior Teeth Anterior Teeth Anterior Teeth |